Welcome to our guide on using the “Disable All WordPress Updates“ plugin.
This handy tool helps you stop automatic updates on your WordPress site.
It’s really useful when you need to keep your site just as it is for a while, like when you’re working on something special or when updates might cause problems.
I’ll show you how to get this plugin onto your WordPress site and how to use it.
This guide is easy to understand, so even if you’re new to WordPress, you can follow along without any hassle.
Let’s get started!

Overview of the Plugin
The “Disable All WordPress Updates” plugin is a tool you can use on your WordPress site to take control of updates.
When you install this plugin, it stops WordPress from automatically updating your themes, plugins, and even the WordPress core itself.
This means you won’t get those automatic updates anymore, which can be really helpful if you need your site to stay just as it is for a bit.
It’s perfect for times when you’re making big changes or when you want to test things out without interruption.
Remember, though, while it’s handy, you’ll need to check for important updates yourself to keep your site secure and running smoothly.
Installation Guide
Installing the “Disable All WordPress Updates” plugin is a straightforward process.
Here’s a simple guide:
Log into your WordPress site
First, you need to log into the dashboard of your WordPress site.
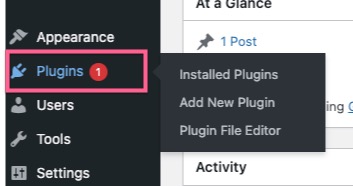
Go to the Plugins Section
Once you’re in the dashboard, find the ‘Plugins’ section on the left-hand menu.

Add New Plugin
Click on ‘Add New Plugin’ at the top of the Plugins page.

Search for the Plugin
In the search bar, type “Disable All WordPress Updates” and hit enter.

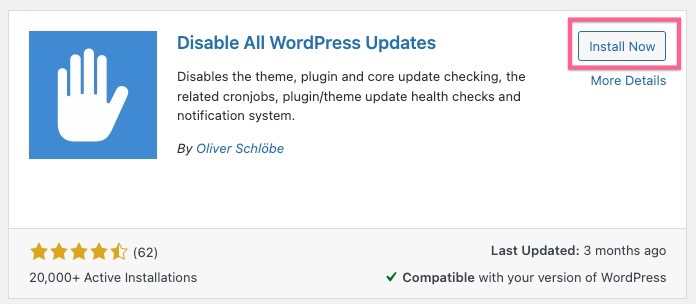
Install the Plugin
You’ll see the plugin in the search results. Click ‘Install Now’ next to it.

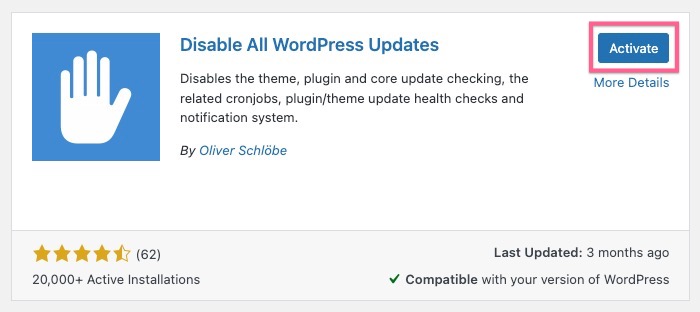
Activate the Plugin
After the plugin is installed, you’ll need to activate it. Just click the ‘Activate’ button that appears in place of the ‘Install Now’ button.

You’re All Set!
Once activated, the plugin starts working immediately. There are no complicated settings to configure.
That’s it! You’ve successfully installed and activated the plugin.
Remember, with this plugin active, WordPress won’t update automatically, so make sure to check for important updates manually.
For more detailed information, you can always refer to the WordPress plugin page.
Configuration and Usage
The “Disable All WordPress Updates” plugin is really easy to use.
Once you’ve installed and activated it, it starts working right away.
There aren’t any complicated settings for you to worry about.
The plugin automatically stops all WordPress updates, including themes, plugins, and the core software.
If you ever need to update something, just temporarily deactivate the plugin. This will allow WordPress to check for and install updates.
After updating, you can reactivate the plugin to stop future updates. It’s a simple tool, but remember to check for important updates regularly to keep your site safe and running well.
Risks and Considerations
When using the “Disable All WordPress Updates” plugin, it’s important to be aware of a few risks and considerations:
Security Risks
- Outdated Software: Not updating WordPress, themes, or plugins can leave your site vulnerable to security risks. Updates often include patches for security flaws.
- Compatibility Issues: Over time, outdated software may become incompatible with new technologies or other updated plugins, potentially leading to website malfunctions.
Performance Impact
- Site Performance: Updates can include optimizations that improve site performance. Without these updates, your site might not run as efficiently.
Best Practices
- Regular Checks: Even with the plugin active, regularly check for and install critical updates manually to ensure site security and performance.
- Staging Environments: If possible, test updates in a staging environment before applying them to your live site to avoid conflicts.
- Backup: Always keep a recent backup of your site. In case something goes wrong, you can restore your site to a working state.
Remember, while the plugin is a powerful tool for specific scenarios, it should be used thoughtfully and responsibly. Regular maintenance is key to a secure and smooth-running WordPress site.

Best Practices
When using the “Disable All WordPress Updates” plugin, following best practices ensures your site remains secure and efficient:
Update Management
- Schedule Regular Updates: Even with updates disabled, plan a regular schedule to manually update and maintain your site.
- Stay Informed: Keep an eye on WordPress, theme, and plugin release notes to be aware of important security patches and new features.
Site Maintenance
- Backup Regularly: Always back up your site before making any changes, especially before manual updates.
- Monitor Site Health: Regularly check your site’s performance and security. Use tools provided by WordPress or third-party services for monitoring.
Using the Plugin Responsibly
- Understand the Purpose: Use the plugin for specific scenarios, like during development or testing, rather than as a permanent solution.
- Deactivate When Necessary: Remember to deactivate the plugin when you need to perform updates and reactivate it afterward if needed.
By adhering to these practices, you can effectively manage your WordPress site while using the “Disable All WordPress Updates” plugin.
Conclusion
In conclusion, the “Disable All WordPress Updates” plugin is a valuable tool for specific situations where you need to control updates on your WordPress site.
Remember, while it’s helpful for certain scenarios like development or testing, it’s important to use this plugin responsibly.
Regularly updating your site is crucial for security and performance.
Be sure to schedule updates, back up your site regularly, and stay informed about new releases.
With the right approach, this plugin can be a useful part of your WordPress toolkit, helping you maintain your site effectively while catering to your specific needs.

Comments
There are no comments yet. You can be the first to let us know your thoughts!